
How to Set Up a LEMP Stack on Ubuntu (Linux, Nginx, MySQL, PHP)
A complete, hands-on guide to building a modern web server from scratch.
If you’ve ever set up a LAMP stack (Linux, Apache, MySQL, PHP), you know the drill — it’s the backbone of half the internet. But there’s a modern alternative that’s faster, leaner, and surprisingly easier to configure once you get the hang of it.
It’s called a LEMP stack — same idea as LAMP, but we swap Apache for Nginx (pronounced “engine-x”). The “E” comes from the middle of “nginx.”
In this tutorial, we’ll build a complete LEMP stack from scratch on Ubuntu 24.04, secure it, and get it serving PHP. By the end, you’ll have a production-ready web server ready to host anything from a WordPress site to a custom PHP app.
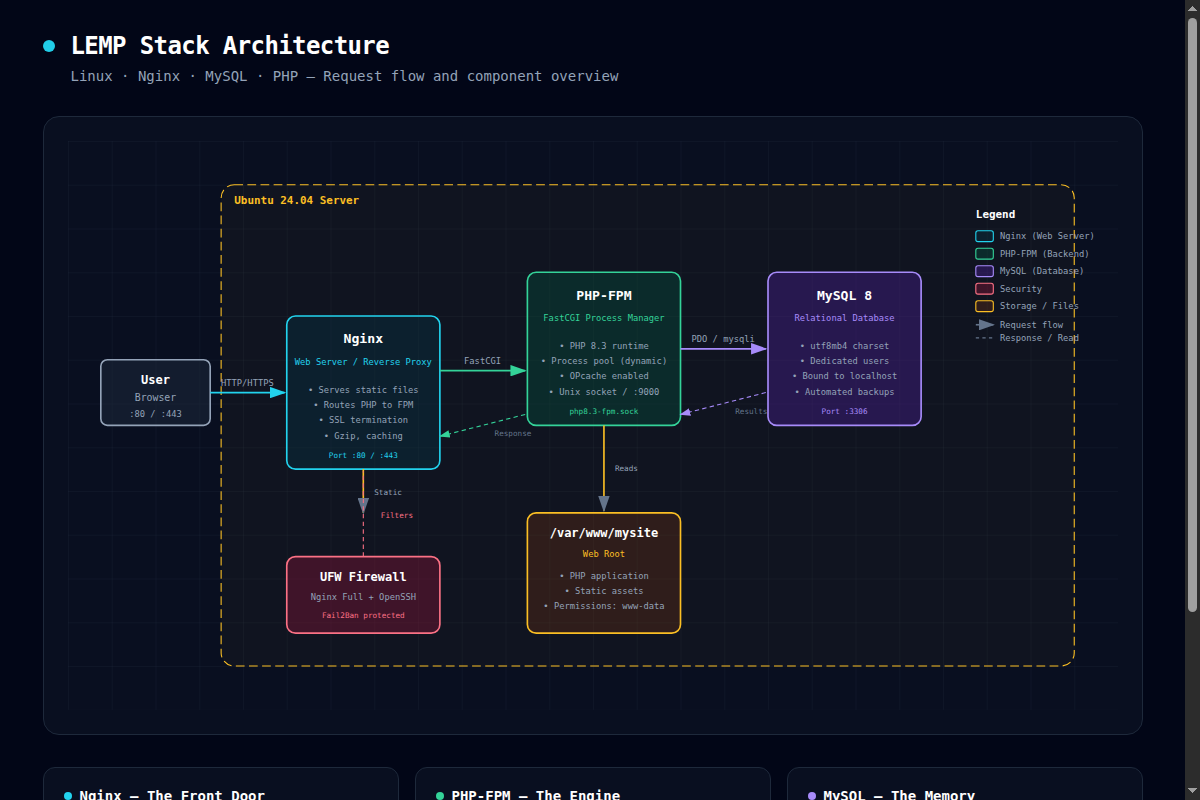
Why Nginx Instead of Apache?

Let’s address the elephant in the room. Apache has been around forever and it’s great. So why switch?
- Performance: Nginx handles concurrent connections with a fraction of the memory Apache uses. It’s built on an event-driven architecture instead of spawning a process per request.
- Static files: Nginx serves static assets (images, CSS, JS) blazingly fast — often right from memory.
- Config syntax: Once it clicks, Nginx config files are cleaner and more logical than Apache’s directives.
- Reverse proxy: Nginx is the industry standard for reverse proxying, load balancing, and caching.
The main trade-off? Nginx doesn’t process .htaccess files. Everything lives in your server blocks. Honestly, that’s a good thing — it forces you to be intentional about your config, and it’s faster because Nginx isn’t checking for .htaccess files on every request.
What We’re Building
Stack:
- Linux: Ubuntu 24.04 LTS
- Nginx: Latest stable from official repo
- MySQL: MySQL 8.x
- PHP: PHP 8.3 with FPM
- SSL: Let’s Encrypt via Certbot
Target audience: Comfortable with basic terminal commands, new to server administration.
Time to complete: ~30 minutes.
Prerequisites:
- A fresh Ubuntu 24.04 server (VPS or local machine)
- SSH access with sudo privileges
- A domain name pointed at your server’s IP (for SSL)
Step 1: System Update and Essentials
First things first — let’s make sure the system has fresh packages and the tools we’ll need.
sudo apt update && sudo apt upgrade -y
sudo apt install -y curl wget gnupg2 ca-certificates lsb-release \
    apt-transport-https software-properties-common ufw unzip
Why: We add the transport-https and properties-common packages now because we’ll need them later to add third-party repos for Nginx and PHP. Doing it all upfront keeps the flow smooth.
Step 2: Install Nginx
Ubuntu’s default repositories ship an older Nginx version. Let’s grab the stable release from Nginx’s official repository:
# Add the official Nginx signing key
curl -fsSL https://nginx.org/keys/nginx_signing.key | \
    sudo gpg --dearmor -o /usr/share/keyrings/nginx-archive-keyring.gpg

# Add the stable repository
echo "deb [signed-by=/usr/share/keyrings/nginx-archive-keyring.pgp] \
    http://nginx.org/packages/ubuntu $(lsb_release -cs) nginx" | \
    sudo tee /etc/apt/sources.list.d/nginx.list

# Pin the official repo over Ubuntu's
cat <
Let's verify it's running:
sudo systemctl start nginx
sudo systemctl enable nginx
sudo nginx -v
# nginx version: nginx/1.26.x (or newer)

curl -I http://localhost
# HTTP/1.1 200 OK
# Server: nginx/1.26.x
What just happened: Nginx is installed and running. When you visit your server's IP in a browser, you'll see the default Nginx welcome page. That's the confirmation it's alive.
Understanding Nginx Config Structure
Before we go further, let's understand how Nginx organizes its configuration. This is a big mental shift if you're coming from Apache:
/etc/nginx/
├── nginx.conf          # Main config - global settings
├── conf.d/             # Drop-in config files (loaded alphabetically)
├── sites-available/    # All your site configs (like Apache's sites-available)
├── sites-enabled/      # Symlinks to sites-available (active sites)
└── snippets/           # Reusable config fragments
Key differences from Apache:
- No
.htaccessfiles — all config lives in server blocks sites-available+sites-enabledmirrors Apache's pattern (familiar!)- Config changes require a reload:
sudo nginx -t && sudo systemctl reload nginx - One server block per site (like Apache's VirtualHost)
Step 3: Install MySQL 8
MySQL is the "M" in LEMP. We'll install it and lock it down.
sudo apt install -y mysql-server
sudo systemctl start mysql
sudo systemctl enable mysql
Secure MySQL Installation
MySQL ships with a security script that walks you through locking things down:
sudo mysql_secure_installation
Here's what to choose:
VALIDATE PASSWORD COMPONENT?      Y (choose strength level 1 = medium)
Set root password?                Y (use a STRONG password)
Remove anonymous users?           Y
Disallow root remote login?       Y
Remove test database?             Y
Reload privilege tables?           Y
Important: For production, avoid using the root account for applications. We'll create a dedicated database and user in a moment.
Create a Database and Dedicated User
sudo mysql -u root -p
-- Create a database (change 'mysite' to your project name)
CREATE DATABASE mysite CHARACTER SET utf8mb4 COLLATE utf8mb4_unicode_ci;

-- Create a dedicated user (use a real password!)
CREATE USER 'mysite_user'@'localhost' IDENTIFIED BY 'YourStr0ng_P@ssw0rd!';

-- Grant privileges
GRANT ALL PRIVILEGES ON mysite.* TO 'mysite_user'@'localhost';

-- Apply changes
FLUSH PRIVILEGES;

-- Verify
SHOW DATABASES;
SELECT user, host FROM mysql.user;

EXIT;
Why a dedicated user: If your app gets compromised, the attacker only has access to one database — not your entire MySQL instance. This is called the principle of least privilege, and it's a security fundamental.
Step 4: Install PHP 8.3 with FPM
Here's the big conceptual shift from Apache. With Apache, you'd typically use mod_php — PHP runs inside Apache itself. Nginx can't do that. Instead, we use PHP-FPM (FastCGI Process Manager), which is a separate service that handles PHP requests.
The flow is:
Browser → Nginx → (is it PHP?) → Yes → PHP-FPM → returns result
                              → No  → serve static file directly
# Add the Ondřej Surý PHP repo (kept up-to-date with latest PHP releases)
sudo add-apt-repository -y ppa:ondrej/php
sudo apt update

# Install PHP 8.3 and common extensions
sudo apt install -y php8.3-fpm php8.3-cli php8.3-common php8.3-mysql \
    php8.3-curl php8.3-gd php8.3-intl php8.3-mbstring php8.3-xml \
    php8.3-zip php8.3-bcmath php8.3-soap php8.3-imagick php8.3-opcache
Let's verify PHP-FPM is running:
sudo systemctl start php8.3-fpm
sudo systemctl enable php8.3-fpm
sudo systemctl status php8.3-fpm
# ✓ Active: active (running)

php -v
# PHP 8.3.x
Tune PHP-FPM
The default PHP-FPM config works, but let's tune it for a typical VPS (2GB RAM):
sudo nano /etc/php/8.3/fpm/pool.d/www.conf
Find and adjust these values:
; Process management — 'dynamic' is the sweet spot for most sites
pm = dynamic

; Max child processes (adjust based on your RAM)
; Rule of max_children = RAM_MB / 30 (so ~64 for 2GB)
pm.max_children = 50

; Start with this many processes
pm.start_servers = 5

; Minimum spare processes waiting for requests
pm.min_spare_servers = 5

; Maximum spare processes
pm.max_spare_servers = 35

; Max requests before a process recycles (prevent memory leaks)
pm.max_requests = 500
# Restart PHP-FPM to apply
sudo systemctl restart php8.3-fpm
Step 5: Wire Nginx + PHP-FPM Together
This is the heart of the LEMP stack — telling Nginx how to talk to PHP-FPM.
First, let's remove the default site and create our own:
# Remove default site
sudo rm /etc/nginx/sites-enabled/default

# Create our site config
sudo nano /etc/nginx/sites-available/mysite.conf
Paste this configuration (adjust server_name to your domain):
server {
    listen 80;
    server_name mysite.com www.mysite.com;

    # Document root — where your PHP files live
    root /var/www/mysite;
    index index.php index.html index.htm;

    # Logging
    access_log /var/log/nginx/mysite.access.log;
    error_log /var/log/nginx/mysite.error.log;

    # Main location block
    location / {
        try_files $uri $uri/ /index.php?$query_string;
    }

    # PHP processing — THIS IS THE KEY PART
    location ~ \.php$ {
        # Pass to PHP-FPM via Unix socket (faster than TCP)
        fastcgi_pass unix:/run/php/php8.3-fpm.sock;
        fastcgi_param SCRIPT_FILENAME $realpath_root$fastcgi_script_name;
        include fastcgi_params;

        # Performance
        fastcgi_buffer_size 128k;
        fastcgi_buffers 4 256k;
        fastcgi_busy_buffers_size 256k;
        fastcgi_read_timeout 300;
    }

    # Security: Block access to hidden files
    location ~ /\. {
        deny all;
        access_log off;
        log_not_found off;
    }

    # Security: Don't serve .env, config, git files
    location ~* \.(env|git|gitignore|gitattributes|lock)$ {
        deny all;
        access_log off;
        log_not_found off;
    }
}
About fastcgi_pass: PHP-FPM can be reached via Unix socket (/run/php/php8.3-fpm.sock) or TCP (127.0.0.1:9000). Unix sockets are slightly faster because they skip the network stack entirely. The socket method is the default on Ubuntu.
Enable the site and test:
# Create the document root
sudo mkdir -p /var/www/mysite
sudo chown -R www-data:www-data /var/www/mysite

# Enable the site
sudo ln -s /etc/nginx/sites-available/mysite.conf /etc/nginx/sites-enabled/

# Test config syntax (ALWAYS do this before reloading)
sudo nginx -t
# nginx: the configuration file /etc/nginx/nginx.conf syntax is ok
# nginx: configuration file /etc/nginx/nginx.conf test is successful

# Reload Nginx
sudo systemctl reload nginx
Create a Test PHP File
Let's confirm PHP is working:
cat <<'EOF' | sudo tee /var/www/mysite/index.php
<!DOCTYPE html>
<html>
<head><title>LEMP Stack Test</title></head>
<body>
    <h1>🎉 It Works!</h1>
    <p>Your LEMP stack is up and running.</p>
    <p>PHP Version: <?php echo phpversion(); ?></p>
    <p>Server Time: <?php echo date('Y-m-d H:i:s'); ?></p>

    <h2>MySQL Connection Test</h2>
    <?php
    try {
        $pdo = new PDO(
            'mysql:host=localhost;dbname=mysite',
            'mysite_user',
            'YourStr0ng_P@ssw0rd!'
        );
        echo '<p style="color: green;">✅ MySQL connection successful!</p>';
    } catch (PDOException $e) {
        echo '<p style="color: red;">❌ MySQL error: ' . $e->getMessage() . '</p>';
    }
    ?>

    <h2>PHP Modules</h2>
    <p><?php echo implode(', ', get_loaded_extensions()); ?></p>
</body>
</html>
EOF
Visit http://your-server-ip in your browser. You should see a green "It Works!" heading, your PHP version (8.3.x), a MySQL connection success message, and a list of loaded PHP modules.
If you see all green checkmarks, congratulations — your LEMP stack is fully operational! 🎉
Step 6: Set Up SSL with Let's Encrypt (Certbot)
A production server needs HTTPS. Let's Encrypt makes this free and automatic:
sudo apt install -y certbot python3-certbot-nginx
sudo certbot --nginx -d mysite.com -d www.mysite.com
Follow the prompts:
- Enter your email address
- Agree to the terms
- Choose whether to redirect HTTP to HTTPS (choose YES — option 2)
Certbot will obtain a certificate from Let's Encrypt, automatically update your Nginx config to use it, and set up automatic renewal.
Verify auto-renewal:
sudo certbot renew --dry-run
# Congratulations, all renewals succeeded.
Check that your site loads at https://mysite.com with a valid lock icon 🔒
Step 7: Security Hardening
Let's lock things down properly.
Configure the Firewall
sudo ufw allow 'Nginx Full'    # HTTP + HTTPS
sudo ufw allow OpenSSH         # SSH access
sudo ufw enable
sudo ufw status
# Status: active
# To                  Action      From
# --                  ----        ----
# Nginx Full          ALLOW       Anywhere
# OpenSSH             ALLOW       Anywhere
Hide Nginx Version Number
By default, Nginx advertises its version in HTTP headers. Let's keep that private:
sudo nano /etc/nginx/nginx.conf
In the http block, add:
http {
    # Hide Nginx version
    server_tokens off;

    # ... rest of config
}
sudo nginx -t && sudo systemctl reload nginx
Harden MySQL
sudo nano /etc/mysql/mysql.conf.d/mysqld.cnf
Add or update:
[mysqld]
# Only listen on localhost (no remote connections)
bind-address = 127.0.0.1

# Don't resolve hostnames (faster connections)
skip-name-resolve

# Disable symbolic links (security)
symbolic-links = 0
sudo systemctl restart mysql
Set Proper File Permissions
# Web root should be owned by www-data
sudo chown -R www-data:www-data /var/www/mysite

# Files: readable by all, writable by owner
sudo find /var/www/mysite -type f -exec chmod 644 {} \;

# Directories: executable by all, writable by owner
sudo find /var/www/mysite -type d -exec chmod 755 {} \;
Install Fail2Ban (Optional but Recommended)
sudo apt install -y fail2ban
sudo systemctl enable fail2ban
sudo systemctl start fail2ban
Fail2Ban monitors logs and bans IPs that show malicious behavior (like repeated failed SSH logins).
Step 8: Performance Tuning
A few quick tweaks to get more out of your stack.
Enable Gzip Compression
sudo nano /etc/nginx/conf.d/gzip.conf
gzip on;
gzip_vary on;
gzip_proxied any;
gzip_comp_level 6;
gzip_types text/plain text/css application/json application/javascript
    text/xml application/xml application/xml+rss text/javascript
    image/svg+xml font/woff2;
gzip_min_length 256;
Configure OPcache (PHP Accelerator)
PHP normally recompiles scripts on every request. OPcache keeps compiled bytecode in memory:
sudo nano /etc/php/8.3/fpm/conf.d/10-opcache.ini
opcache.enable = 1
opcache.memory_consumption = 256
opcache.interned_strings_buffer = 16
opcache.max_accelerated_files = 10000
opcache.revalidate_freq = 2
opcache.validate_timestamps = 1
Note: Set opcache.validate_timestamps = 0 in production for maximum performance, but you'll need to manually clear the cache after deploying code changes (using php -r 'opcache_reset();' or restarting PHP-FPM).
sudo systemctl reload nginx
sudo systemctl restart php8.3-fpm
Quick Reference: Common Commands
# Nginx
sudo nginx -t                  # Test config syntax
sudo systemctl reload nginx    # Apply config changes (no downtime)
sudo systemctl restart nginx   # Full restart
sudo nginx -T                  # View full compiled config

# PHP-FPM
sudo systemctl restart php8.3-fpm
php -m                         # List loaded PHP modules
php -i | grep "php.ini"       # Find active php.ini location

# MySQL
sudo mysql -u root -p         # Access MySQL shell
sudo systemctl restart mysql
sudo mysqladmin -u root -p status  # Quick health check

# Certbot
sudo certbot certificates     # List certificates
sudo certbot renew --dry-run # Test renewal

# Logs
sudo tail -f /var/log/nginx/mysite.error.log
sudo tail -f /var/log/nginx/mysite.access.log
sudo tail -f /var/log/php8.3-fpm.log
Troubleshooting Common Issues
"File Not Found" errors
Check your root directive in the Nginx server block and verify the file exists at /var/www/mysite/yourfile.php.
PHP files download instead of executing
Nginx isn't passing PHP to PHP-FPM. Check that:
- PHP-FPM is running:
sudo systemctl status php8.3-fpm - The socket path matches:
ls -la /run/php/php8.3-fpm.sock - Your
location ~ \.php$block is correct
"502 Bad Gateway"
PHP-FPM isn't responding. Usually means:
- PHP-FPM is crashed:
sudo systemctl restart php8.3-fpm - Wrong socket path in Nginx config
- PHP-FPM ran out of processes (check
pm.max_children)
MySQL connection refused
- MySQL isn't running:
sudo systemctl start mysql - Wrong credentials in your PHP app
- User doesn't have permissions:
SHOW GRANTS FOR 'mysite_user'@'localhost';
Nginx won't start after config changes
Always check syntax first: sudo nginx -t — it'll tell you exactly which line has the problem.
What's Next?
You've got a fully functional LEMP stack! Here's where to go from here:
- Install WordPress: Download it to
/var/www/mysite, point your browser at it, and complete the famous 5-minute install using the MySQL credentials we created. - Set up a reverse proxy: Nginx can proxy requests to Node.js, Python, or other backend apps running on different ports.
- Configure monitoring: Tools like
netdataorprometheus+grafanagive you real-time insight into your server's health. - Set up automated backups: Cron jobs to dump your MySQL database and rsync your web files to a remote location.
Last updated: June 2026. Tested on Ubuntu 24.04 LTS with Nginx 1.26, PHP 8.3, MySQL 8.4.
Leave a Reply